
how to remove ticks from cats safely starts with two priorities: don’t squeeze the tick’s body, and don’t panic and yank with your fingers, both moves can raise infection risk and leave mouthparts behind.
If you live in the U.S., ticks are a routine problem in many regions, and cats that go outdoors, ride in carriers on grass, or even share space with dogs can bring a tick inside. The good news is that safe removal is usually straightforward when you use the right tool and a calm, methodical approach.

What trips people up is not the pulling, it’s the prep and the aftercare. This guide covers quick risk checks, the safest removal steps, what to do with the tick afterward, and where home care ends and your veterinarian should take over.
Why safe tick removal matters (and what can go wrong)
A tick is more than an “icky bug,” it’s a feeding parasite that anchors its mouthparts into skin. Rough removal can irritate the bite site, increase local inflammation, and sometimes leave pieces behind.
Also, many tick “folk remedies” backfire. According to the CDC, you should avoid using petroleum jelly, heat, nail polish, or other substances to make a tick detach, because these methods can cause delays and may make removal harder.
- Crushing the body can push fluids into the bite area, not what you want.
- Leaving mouthparts can keep the site irritated and prone to infection.
- Using the wrong chemicals may harm cats, who are sensitive to certain insecticides and essential oils.
Quick checklist: is this a “remove at home” situation?
Before you reach for tweezers, take 20 seconds to decide whether you should stop and call a vet. Many ticks can be removed at home, but not all situations are equal.
- You can usually remove at home: tick is on the body, you can clearly see it, your cat tolerates gentle handling, and the skin around it looks calm.
- Consider vet help: tick is near the eye, inside the ear canal, between toes where you can’t get a good angle, or your cat becomes aggressive or very stressed.
- Seek vet guidance promptly: your cat seems ill (lethargy, feverish behavior, not eating), you see multiple ticks, or the bite site is very swollen, oozing, or painful.
If you’re unsure, it’s reasonable to call your clinic and describe where the tick is and how your cat is acting. A quick phone triage often saves a messy attempt at home.
What you need (and what to avoid)
The best “tool” is whatever lets you grasp close to the skin without crushing the tick. Fine-tipped tweezers work, and dedicated tick-removal tools can be even easier, especially with wiggly cats.
Supplies to gather
- Fine-tipped tweezers or a tick-removal hook/tool
- Disposable gloves or a tissue
- Antiseptic (pet-safe) or mild soap and water
- Small jar or zip bag to save the tick
- Towel (for a gentle “cat burrito” wrap)
- Treats, because cooperation is half the job
Things to avoid
- Essential oils (many are risky for cats, even when “natural”)
- Heat (matches, lighters), it can burn skin and doesn’t improve removal
- Alcohol on the tick before pulling, it may irritate the area and doesn’t reliably help
- Flea/tick dog products unless your vet confirms cat-safe use
How to remove a tick from a cat safely (step-by-step)
how to remove ticks from cats safely comes down to slow hands and the right grip: close to the skin, steady upward traction, then clean and monitor.
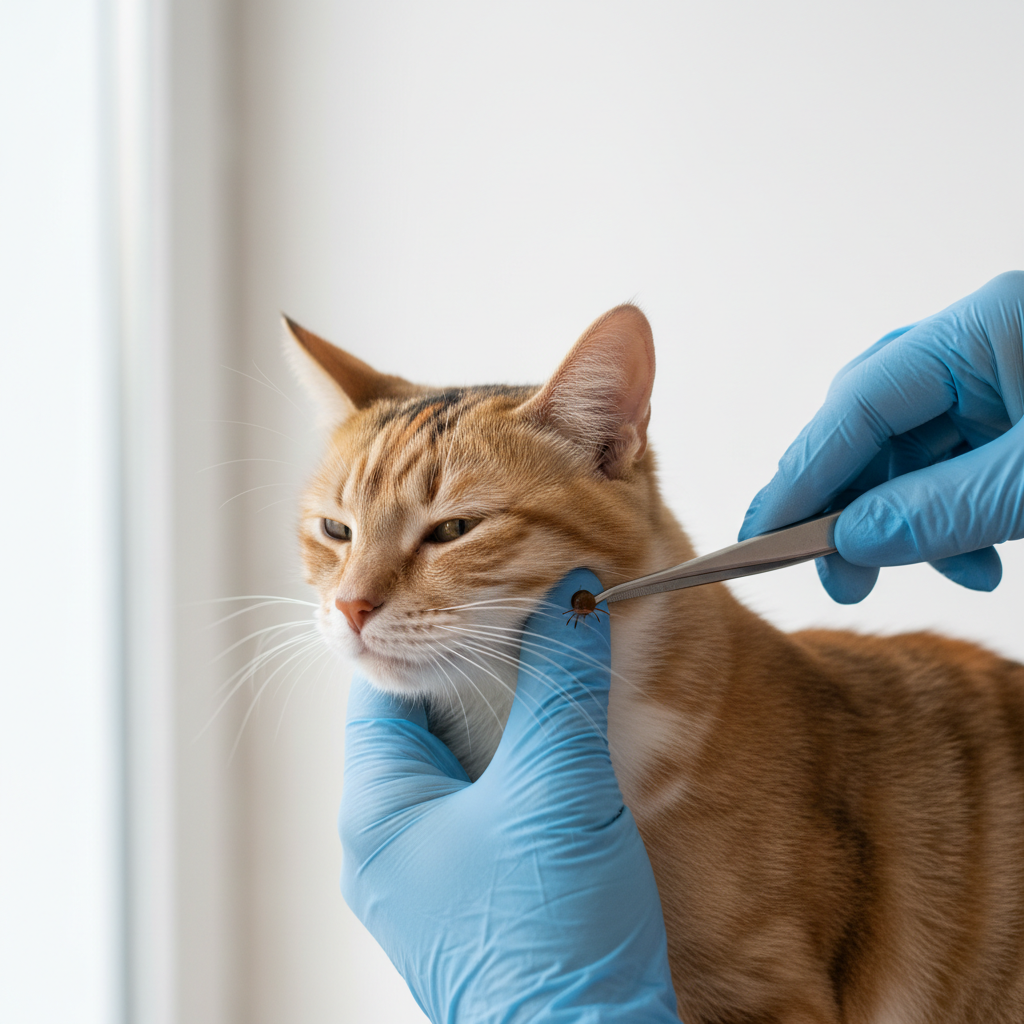
Step 1: Set up your environment. Choose a bright spot, turn on a flashlight if needed, and keep supplies within arm’s reach. If your cat tends to bolt, close the door.
Step 2: Position your cat. Many cats do better wrapped in a towel with only the head or the affected area exposed. If you have a helper, ask them to hold calmly and offer treats.
Step 3: Part the fur and find the attachment point. You want to see where the tick’s mouthparts enter the skin, not just the round body sitting on top of fur.
Step 4: Grasp close to the skin. With fine-tipped tweezers, grab the tick as close to your cat’s skin as possible. Avoid squeezing the swollen abdomen.
Step 5: Pull straight up with steady pressure. Don’t twist, jerk, or “pop” it out fast. Slow, consistent traction usually releases the mouthparts intact.
Step 6: Check the tick and the site. If the tick looks intact, great. If you suspect mouthparts remain (a tiny dark speck that won’t wipe away), don’t dig aggressively; that often creates more trauma than the remnant itself.
Step 7: Clean the area. Use mild soap and water or a pet-safe antiseptic. If your cat licks everything, pick a cleaning method your vet considers safe for felines.
After removal: what to do with the tick and the bite site
People often throw the tick away immediately, then regret it when symptoms show up a week later. Keeping it briefly can be useful if your vet asks what type it was.
- Save the tick in a sealed jar or bag, label with date and where on the body you found it.
- Don’t crush it with bare fingers; use gloves or tissue.
- Monitor the bite site for 1–2 weeks: mild redness can happen, but it should gradually improve.
According to the AVMA, prompt tick removal helps reduce the chance of disease transmission. That said, not every tick carries disease, and not every bite causes illness, your job is to watch for meaningful changes without spiraling.
What to watch for in your cat
- Decreased appetite, low energy, hiding more than usual
- Lameness, stiffness, sensitivity when picked up
- Feverish behavior (warm ears, unusual lethargy), vomiting, or pale gums
- Worsening swelling, pus, or a bad smell at the bite site
Common mistakes that make tick removal harder
Most problems come from rushing, using dull tweezers, or trying to “help” the tick let go with substances. In practice, a clean grab-and-pull beats a complicated ritual.
- Pulling at an angle can tear skin or break the tick.
- Trying multiple times with poor grip usually inflames the area and stresses your cat.
- Skipping restraint makes sudden movement more likely, which is how you end up pinching skin.
- Over-cleaning with harsh products can irritate sensitive feline skin.
If you’re already on attempt number three and your cat is done with you, that’s the moment to stop, not push through.
Prevention that actually fits real life (indoor, outdoor, multi-pet)
how to remove ticks from cats safely is useful, but the easier win is fewer ticks overall. Prevention is very cat-specific because cats groom intensely and have unique sensitivities.

Practical prevention options
- Vet-recommended tick preventives (topical or oral), choose products labeled for cats and your cat’s weight range.
- Regular tick checks during peak season, especially around the head, neck, collar line, and under the front legs.
- Yard and environment habits: keep grass trimmed, reduce brush piles, and check yourself and dogs after hikes.
- Indoor-only still matters: ticks can hitchhike on people, dogs, and even on gear.
According to the FDA, some flea and tick products can cause adverse reactions in pets, especially if you use the wrong species product or the wrong dose, so it’s worth confirming your plan with a veterinarian if you’re switching brands or combining treatments.
At-a-glance guide: safest method by situation
If you want a quick decision tool, use this table and pick the least stressful option for your cat. Less wrestling usually means a cleaner removal.
| Situation | Recommended approach | Why |
|---|---|---|
| Tick on back/side with clear view | Fine-tipped tweezers, straight pull | Best control near skin, low risk of crushing |
| Thick fur, hard to see attachment point | Tick-removal tool + good lighting | Tool can slide under tick without pinching fur |
| Near eye, lip, or inside ear area | Vet removal (or at least call first) | Delicate tissue, higher risk of injury at home |
| Cat is fractious or very anxious | Pause, towel wrap, consider vet visit | Safer than forcing it and causing bites/scratches |
| Multiple ticks found | Remove what you can, then vet consult + prevention | May indicate heavy exposure and higher illness risk |
Key takeaways (read this if you’re in a hurry)
- Grip close to the skin, pull straight up slowly, avoid twisting and squeezing.
- Skip home “detachment” tricks like heat or petroleum jelly.
- Clean and monitor the site, save the tick in case your vet wants to see it.
- Call a vet if the tick is in a delicate area or your cat seems unwell afterward.
Conclusion: calm removal, smart monitoring, better prevention
how to remove ticks from cats safely is mostly about doing less, but doing it correctly: a steady pull with the right tool, gentle cleaning, and a short period of watchful monitoring. If anything about the location, your cat’s behavior, or post-bite symptoms feels off, getting veterinary guidance is a reasonable next step.
If you want one action to take today, put a small tick kit where you can find it fast and talk with your veterinarian about a cat-safe preventive that matches your region and your cat’s lifestyle.